Using accounting software like Bookkeeper to print checks can make financial management easier and faster. If you’ve ever wondered, “How I print a check on Bookkeeper” this guide will walk you through the process step by step. Printing checks directly from Bookkeeper saves time, reduces manual errors, and helps you keep clear financial records.
Whether you’re printing checks for business expenses or personal finances, this tutorial will help you get the job done in no time.
How I Print a Check on Bookkeeper: Step-by-Step
Before you print a check, you’ll need to make sure the bookkeeper is set up properly. Follow these basic setup steps to get started:
Set Up Your Bank Account: First, add your bank account to Bookkeeper. Go to the “Settings” section, select “Bank Accounts,” and enter your bank information. This step is crucial, as Bookkeeper needs to know which account to associate with your check.
Connect Your Printer: Ensure your printer is connected to your computer and can communicate with Bookkeeper. Bookkeeper supports most standard printers, so you shouldn’t have issues as long as your printer is installed correctly.
Choose the Right Check Template: Bookkeeper allows you to select different check templates based on the type of checks you’re using. Make sure you select the correct template that matches your check paper format to avoid alignment issues.
Step 1: Access the Check Printing Feature
Now that you’re set up, you can start by locating the check printing feature in Bookkeeper. To do this:
- Open Bookkeeper and go to the “Tools” section on the main dashboard.
- Look for the “Cheque Printing” option, depending on your version.
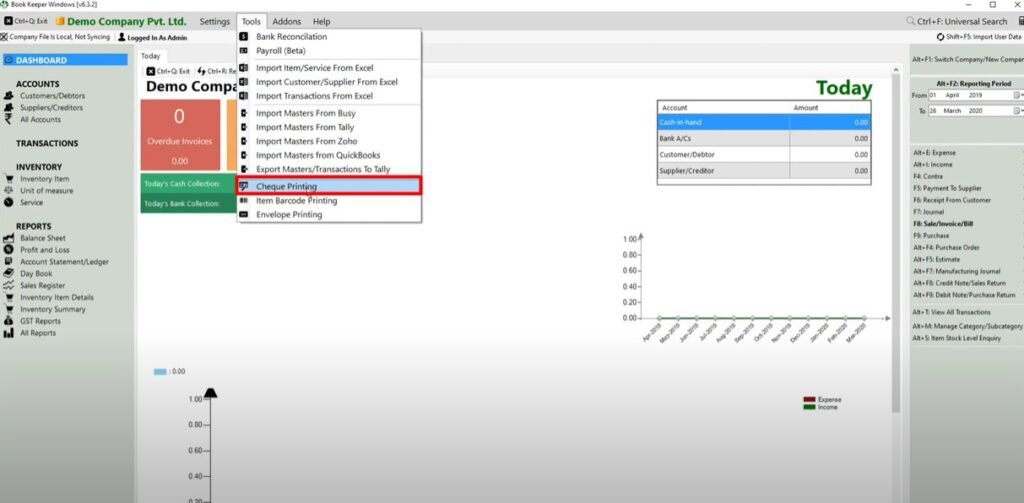
- Select the account you’d like to write the check from, and click on “Write a Check.”
This feature is designed to make check creation easy, with fields for entering all necessary information.
Step 2: Enter Check Details
Once you’re in the check printing tool, it’s time to enter the details for the check you want to print:
Payee Information: Start by entering the name of the person or business you’re paying. Double-check spelling to make sure everything is correct.
Check Amount: Enter the amount you’re paying on the check. Bookkeeper will automatically format this in currency.
Memo Line: If needed, add a memo to indicate what the check is for (e.g., “Invoice #123”). This can help you keep track of expenses.
Review Information: Carefully review all details before moving on to the next step. Confirm that the amount, payee, and memo are accurate.
Bookkeeper makes this process easy by clearly labeling each field, so you know exactly where each piece of information should go.
Step 3: Format and Preview the Check
After entering your check details, it’s essential to format and preview the check before printing:
Adjust Margins and Alignment: In the print settings, you can adjust margins to ensure your check details align with the check paper. Each printer may have slightly different settings, so make adjustments as needed.
Preview the Check: Bookkeeper has a preview function that lets you see exactly how the check will look once printed. This is a valuable step to catch any alignment or formatting issues before printing.
Check Paper Placement: Make sure the check paper is correctly loaded into the printer tray.
Usually, the top edge of the check goes in first, but check your printer’s manual to be certain.
Previewing your check is crucial to ensure that everything is aligned and ready for a smooth print.
Step 4: Print the Check
Now it’s time to print. Here’s how I print a check on Bookkeeper:
Click on Print: After reviewing the preview, click on the “Print” button. Bookkeeper will send the check details to your printer.
Check Printer Settings: Make sure your printer is set to the correct paper size and orientation.
Print on Standard Check Paper: Use official check paper that is compatible with Bookkeeper and your bank.
This ensures your checks look professional and meet banking standards.
Once printed, give the check a quick review to confirm everything printed as expected.
Troubleshooting Common Issues
Sometimes, issues can occur while printing checks. Here are common problems and their solutions:
Misaligned Checks: If your check prints out of alignment, go back to the settings and adjust the margins. Preview the check again before printing.
Printer Connection Problems: If Bookkeeper can’t find your printer, make sure it’s properly connected and that you’ve selected the correct printer in Bookkeeper’s settings.
Missing Check Details: If information is missing on the check, double-check your entry fields in Bookkeeper to ensure all details were correctly filled out.
By troubleshooting these common issues, you can avoid delays and ensure your checks print accurately.
Final Thoughts
Learning how I print a check on Bookkeeper can simplify your financial tasks. Bookkeeper makes it easy to enter check details, preview formatting, and print checks, helping you avoid manual errors and stay organized. With these step-by-step instructions, you’ll be able to print checks efficiently and professionally. Enjoy the ease and control that Bookkeeper brings to managing your finances! Always stay in touch with the helpful blogs from Fiscal Profits. Thank you for reading!